Setup and Access
Configure your workspace, add people, then create a personal API key only if you need an MCP client or an allowed REST agent route.
Open settings
- Open Settings from the app sidebar.
- Use Workspace for workspace name, color, and icon.
- Use API Keys or MCP Servers under Developer & Integrations for agent access.
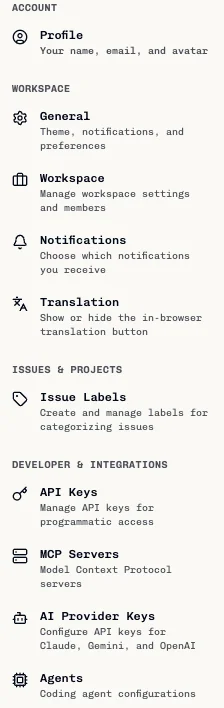
Workspace member access is managed under Admin → People & Access. Role definitions are under Admin → Permissions. These pages require an account with the corresponding access.
Add a workspace member
- Open Admin → People & Access.
- Select Add person.
- Enter the person's email. Name and title are optional prefill fields.
- Keep required workspace access enabled and choose Admin or Member.
- Optionally enable one or more team checkboxes and choose the team role.
- Review the seat impact and invitation details, then select Send invite.
The UI says the person receives a magic-link email and has seven days to accept. Sending an invite is an external email action. Use Members and Roles to compare roles before sending it.
Create and protect an API key
- Open Settings → API Keys.
- Select Create API Key, give the key a recognizable name, and choose whether to make it read-only. A read-only key can read data through MCP but cannot create or update it there.
- Create the key, copy it from the reveal panel, and store it in your password manager or deployment secret store. The full key appears in a reveal panel after creation; store it before closing that panel.
- Do not paste a key into documentation, source control, chat, or a shared screenshot.
- Delete the key from API Keys to revoke it when it is no longer needed.
The MCP access switch and allowed-client list on Settings → API Keys apply to the account's API keys. Turning MCP off blocks those keys from MCP but does not change REST access; allowlist changes can take up to five minutes.
Keys use the vk_ prefix. They authenticate as the key owner's user identity. They are not unrestricted: browser-session-only routes include key management, admin, billing, invitations, membership and role changes, sharing controls, and destructive deletes. Use a browser session for those operations.
Connect an MCP client
- Generate a key from Settings → API Keys.
- In Settings → API Keys, review the MCP access switch and optional allowed-client list for your account. Client names must match exactly; an empty list allows any client.
- Register
https://mcp.i-kanban.com/ssein the MCP client using Streamable HTTP and anAuthorization: Bearer <key>header. - Store the key through the client's secret or environment-variable facility.
- Ask the client to call a read operation such as
list_teamsand confirm it returns only teams available to the key owner.
MCP client settings are per client. For the command-line examples and tool behavior, see MCP Usage.
Use API keys with REST
Some agent-facing REST routes also accept a vk_ bearer key, including supported issue, sprint, document, comment, deployment, and test-run operations. The key middleware applies a route deny-list; support for one endpoint does not mean every /api route is available to API keys. Check the current agent/API documentation for the exact operation and payload. Browser-session-only actions listed above stay unavailable to API keys.
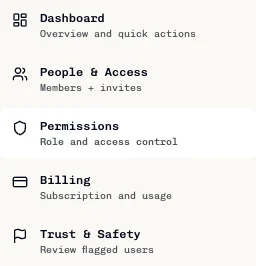
Use Admin → People & Access to invite workspace members. Use Admin → Permissions → Show permission tables to compare role capabilities without editing the interactive access matrix.
For example REST payloads used by Launch Readiness, see Feeding Launch Readiness. Treat those routes as a supported agent surface, not a promise that all REST endpoints are public or stable.
Mentions use the current input surface
- Task comments: type
$and select a person from Team member suggestions.@is used for agent commands in the issue comment surface. See Creating Tasks. - Team chat: typed
@nameis not verified as a person mention or notification trigger. Use task comments for a person picker.
No invite or comment is required to configure the account. Role updates, invites, and API-key changes take effect only after you submit their respective controls.